
When your riding lawn mower starts to struggle, especially on those steep hills, the carburetor could be the unseen culprit. Learning how to clean a carburetor on a riding lawn mower is essential for ensuring your mower has the power to tackle uneven terrain. I’ve often found that a well-maintained carburetor is the heart of a machine, quietly fueling its efficiency, particularly when the going gets tough.
A clean carburetor ensures that the engine receives the proper mix of fuel and air, which is crucial for smooth operation on flat lawns and for delivering the consistent power needed for those challenging hills. Read the following article by Best Lawn Mower for Hills to learn about detailed cleaning methods and related issues.
Understanding the Carburetor on a Riding Lawn Mower
Where’s the Carburetor Located on Your Mower?
Finding the carburetor on your riding lawn mower is akin to locating the heart in a living being—it’s essential but often hidden in plain sight. Typically, you’ll find the carburetor nestled close to the engine, just below or beside the air filter. On most models, it’s connected to the throttle and fuel lines, making it the gateway through which your mower breathes and feeds. Depending on the make and model, accessing it might require removing the engine cover, but once you locate it, the maintenance task becomes much clearer.
The Carburetor’s Impact on Engine Performance
Keep your carburetor clean to ensure consistent power and prevent stalling on hills
A well-functioning carburetor is the silent workhorse behind your mower’s performance, especially when you’re dealing with hilly terrain. This component is responsible for mixing air and fuel in the right proportions, ensuring that the engine produces the necessary power. On flat terrain, you might get away with a carburetor that’s not in peak condition, but the moment you introduce hills into the equation, the stakes rise.
A dirty or clogged carburetor can lead to sputtering, inconsistent power, and even engine stalling as your mower struggles to draw the fuel it needs. This is why regular cleaning isn’t just maintenance—it’s a safeguard against your machine failing you when you need it most.
Preparing for the Job: Safety and Tools You’ll Need
Safety First—Protecting Yourself and Your Mower
Before you even consider reaching for your tools to learn how to clean a carburetor on a riding lawn mower, let’s talk safety. Disconnecting the spark plug is non-negotiable—it’s your first line of defense against accidental starts. Imagine the engine’s power suddenly kicking in while you’re cleaning; it’s not just inconvenient, it’s dangerous. Also, ensure that your mower is on stable, level ground. A tilted mower, especially one that you use on slopes, is a hazard waiting to happen. Taking these precautions might seem overkill, but they’re essential to protect you and your machine.
Essential Tools for the Task
When cleaning a carburetor, the right tools make all the difference. You’ll need a reliable carburetor cleaner, a set of screwdrivers, and safety gear like gloves and goggles. Each has a crucial role—gloves to protect your hands from chemicals, goggles to shield your eyes, and screwdrivers to disassemble the carburetor without damaging it. These tools aren’t just suggestions; they’re your partners in ensuring the job is done efficiently and safely.
Use proper tools like cleaners, screwdrivers, and safety gear for effective carburetor cleaning
Getting Ready—What You Need to Do Before Cleaning
Start by letting the mower cool down; working on a hot engine is not just uncomfortable, it’s risky. Once cooled, take a moment to review the mower’s manual. Every model has its quirks; knowing these specifics can save you time and prevent costly mistakes. Trust me, this small step can be the difference between a smooth cleaning process and a frustrating ordeal.
Step-by-Step Guide: Cleaning the Carburetor on Your Riding Lawn Mower
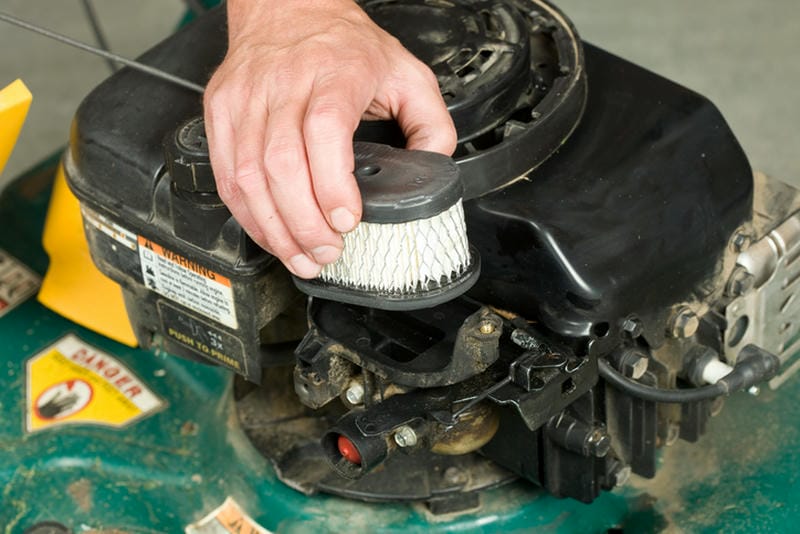
Step 1: Accessing the Carburetor—Removing the Air Filter
The first step in cleaning your carburetor is gaining access to it. Typically, this means removing the air filter, which is usually housed in a plastic or metal casing on the side of the engine. Depending on your mower model, you might need a screwdriver to open the casing. Once the filter is out of the way, you’ll have a clear view of the carburetor, allowing you to proceed with the next steps.
Step 2: Detaching the Carburetor—A Delicate Operation
Detaching the carburetor requires a careful hand. Start by disconnecting the fuel line, taking care to avoid any spills. Next, unscrew the bolts or clamps that hold the carburetor in place. Gently remove the carburetor from the engine, ensuring no damage to any surrounding components. Remember, this is the heart of your mower’s engine, so handle it with the respect it deserves.
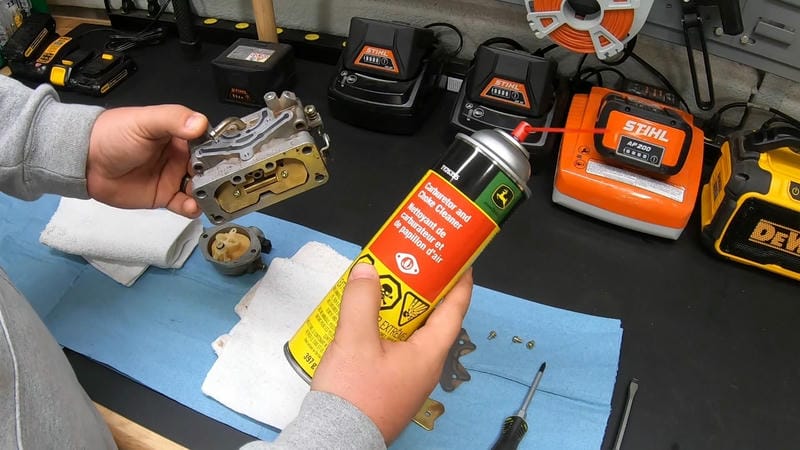
Step 3: Disassembling the Carburetor—Inspecting Every Part
Once the carburetor is off, it’s time to disassemble it. Pay close attention to the jets, needles, and other small parts—these critical components regulate fuel flow. As you take it apart, inspect each piece for wear or damage. This step is crucial for identifying issues that could be affecting your mower’s performance, especially when mowing on challenging terrain.
Step 4: Cleaning the Carburetor—Reviving Its Efficiency
Now comes the cleaning. To properly understand how to clean a carburetor on a riding lawn mower, use a high-quality carburetor cleaner to remove any varnish, debris, or build-up that could be clogging the jets or fuel passages. Spray the cleaner through all openings, ensuring that every part is thoroughly cleaned. This step is essential for restoring the carburetor’s efficiency and ensuring your mower runs smoothly, especially when climbing those steep hills.
Step 5: Replacing Worn Parts—Don’t Skip This
During reassembly, take the opportunity to replace any worn or damaged parts, particularly gaskets and seals. These components are vital for maintaining the carburetor’s performance. Skipping this step could mean all your cleaning efforts are wasted, as worn parts can lead to fuel leaks and poor engine performance.
Step 6: Reassembling and Reinstalling the Carburetor—Bringing It All Together
Finally, it’s time to put everything back together. Carefully reassemble the carburetor, making sure all parts are properly aligned. Once reassembled, reinstall the carburetor onto the engine, reconnect the fuel line, and secure it. Double-check all connections before moving on to start your mower. With everything in place, your mower should be ready to tackle even the steepest hills easily.
The Alternative Approach: Cleaning the Carburetor Without Removal
When a Quick Clean Will Do the Trick
There are times when removing the carburetor isn’t necessary. Routine maintenance or minor performance issues can often be resolved with a quick clean right where it sit. I’ve found that a quick clean can be a practical solution, especially if your mower has started to show signs of sluggishness but isn’t yet struggling on those steeper slopes. It’s a proactive measure that keeps your mower in peak condition without the need for full disassembly.
A quick carburetor clean can resolve minor issues, keeping your mower in peak condition without full disassembly
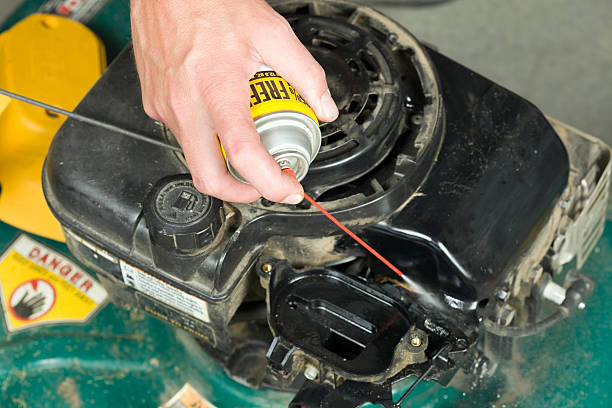
How to Perform a Quick Clean
To clean the carburetor without removing it, start by making sure the engine is off and the spark plug is disconnected. Remove the air filter to gain access, and then spray carburetor cleaner directly into the carburetor throat, focusing on the area where the fuel and air mix. Give it a few minutes to dissolve any build-up, then start the engine briefly to allow the cleaner to work through the system. This method, while simple, can be incredibly effective in maintaining performance, especially when you’re frequently mowing on hilly terrain.
The Impact of Carburetor Maintenance on Mowing Hills
Why Hills Demand a Clean Carburetor
Mowing hills is no easy task, and it demands every bit of power your mower can muster. I’ve seen firsthand how even the smallest neglect in carburetor maintenance can lead to significant performance issues when tackling slopes. The engine is under more strain when climbing, requiring a precise mix of fuel and air to keep running smoothly. A clean carburetor is crucial here—it ensures that the engine can produce the power needed to ascend steep inclines without sputtering or stalling. This isn’t just about getting the job done; it’s about doing it safely and efficiently.

A clean carburetor is essential for maintaining engine power and ensuring safe, efficient mowing on steep hills
The Risks of Ignoring Carburetor Maintenance on Slopes
Neglecting carburetor maintenance, especially when you’re mowing hills, can lead to many serious consequences. Power loss on an incline isn’t just inconvenient—it’s dangerous. Imagine your mower stalling midway up a slope, leaving you stranded or, worse, causing an uncontrolled rollback. The consequences of such a failure can be severe, both for the machine and the operator. Regular carburetor cleaning is essential to prevent these risks, ensuring your mower remains reliable even in the toughest mowing conditions.
Routine Maintenance: How Often Should You Clean Your Carburetor?
Setting a Maintenance Schedule
I’ve learned that consistency is key when it comes to maintaining your riding lawn mower, especially if you’re regularly mowing on hills. A good rule of thumb for how to clean a carburetor on a riding lawn mower is to do it at the start and end of the mowing season. However, if you’re tackling steep inclines often, consider doing it more frequently—perhaps every 25 hours of use. This schedule helps ensure that your mower is always in peak condition, ready to handle whatever terrain you throw at it.
Signs It’s Time for Another Clean

Look for signs like misfiring, power drops, or hard starting—these indicate your carburetor needs cleaning
Your mower will often tell you when it’s time for a carburetor cleaning—you just need to know the signs. If you notice the engine misfiring, experiencing power drops on hills, or struggling to start, it’s likely your carburetor needs attention. These symptoms indicate that the fuel-air mix is off, often due to blockages or build-up in the carburetor. Addressing these issues promptly can prevent more significant problems down the road, ensuring your mower continues to perform at its best.
FAQs
How do I know if my carburetor needs cleaning?
I often get asked how to tell when a carburetor needs cleaning. The signs are usually clear: your mower might struggle to start, misfire, or lose power, especially when mowing on hills. If you’re noticing these issues, it’s a good indication that your carburetor is clogged or dirty and needs maintenance.
Can I clean the carburetor without removing it from the mower?
Yes, you can clean the carburetor without removing it, and I recommend this for routine maintenance or minor issues. By spraying carburetor cleaner directly into the carburetor’s throat with the air filter removed, you can often clear minor blockages and keep your mower running smoothly.
How often should I clean my carburetor?
The frequency of cleaning depends on your mowing habits. I suggest cleaning it at least twice a year—at the beginning and end of the mowing season. However, if you frequently mow on hills or notice performance drops, you might need to clean it more often, perhaps every 25 hours of use.
Conclusion
As I reflect on the importance of maintaining your riding lawn mower, particularly its carburetor, one thing is clear: regular upkeep is essential. Understanding how to clean a carburetor on a riding lawn mower is more than just a minor maintenance task—it’s a key component in ensuring your mower operates efficiently, especially on challenging terrains like hills. Neglecting this can lead to significant performance issues, putting both your equipment and safety at risk.
I believe that making carburetor cleaning a routine part of your mower maintenance is not just advisable; it’s necessary. By staying proactive, you can ensure your mower is always ready to tackle the toughest tasks. So, take the time to clean and care for your mower, and it will reward you with reliable performance, season after season. Remember, the hills may be steep, but with proper maintenance, your mower will handle them with ease.
2 comments
[…] step to fix lawn mower carburetor issues, especially when dealing with clogs or performance dips. A clean carburetor ensures a smooth fuel flow, which keeps the engine running efficiently. This step requires careful […]
[…] carburetor is often the first part affected by bad gas, as sticky residues can clog its components. Cleaning the carburetor will help clear any blockages and restore fuel […]